Awesome. A new noise!

XR4Ti / Sierra / Sierra Cosworth Discussions - Questions, problem resolution, general talk, technical tips and modifications.
Merkur Club web site
thesameguy
Level 7
Level 7
Posts: 2625
Joined: Mon Apr 18, 2005 5:06 pm
Location: Sacramento
Contact:

Re: Awesome. A new noise!

Post by thesameguy »

Well, things are moving along again.... I literally have three steps left:

1. Install new rear brakes - replacing the Taurus/TurboCoupe with Tim's Focus setup
2. Replace motor mounts - who knows how old stock mounts with Rapido gel mounts
3. Replace TurboCoupe T5 with Mustang T5 - new input shaft, MDL adapter, and new Sachs clutch

Sunday I knocked out #1. Totally painless operation. I had to reuse the axle nuts (obviously)... but found a great way to torque them down!

Image

Hopefully next weekend I can pick up a transmission - I already have the clutch. I wanna do the motor mounts last so they don't get tweaked swapping transmissions around. :)
john keefe
Level 7
Level 7
Posts: 1069
Joined: Sat Sep 02, 2006 1:13 pm
Location: Campbell, CA

Re: Awesome. A new noise!

Post by john keefe »

Nice setup. Where's the TQ meter from, and was that hub brace part of a Rotunda kit? I have to do it the old-fashioned way... weigh myself, calculate lever arm length to get 230ft-lbs, put a piece of tape on the breaker bar at that lever arm length, then bounce once on the tape on one foot. Crude, but effective, unless the breaker bar twists (ouch). :D
thesameguy
Level 7
Level 7
Posts: 2625
Joined: Mon Apr 18, 2005 5:06 pm
Location: Sacramento
Contact:

Re: Awesome. A new noise!

Post by thesameguy »

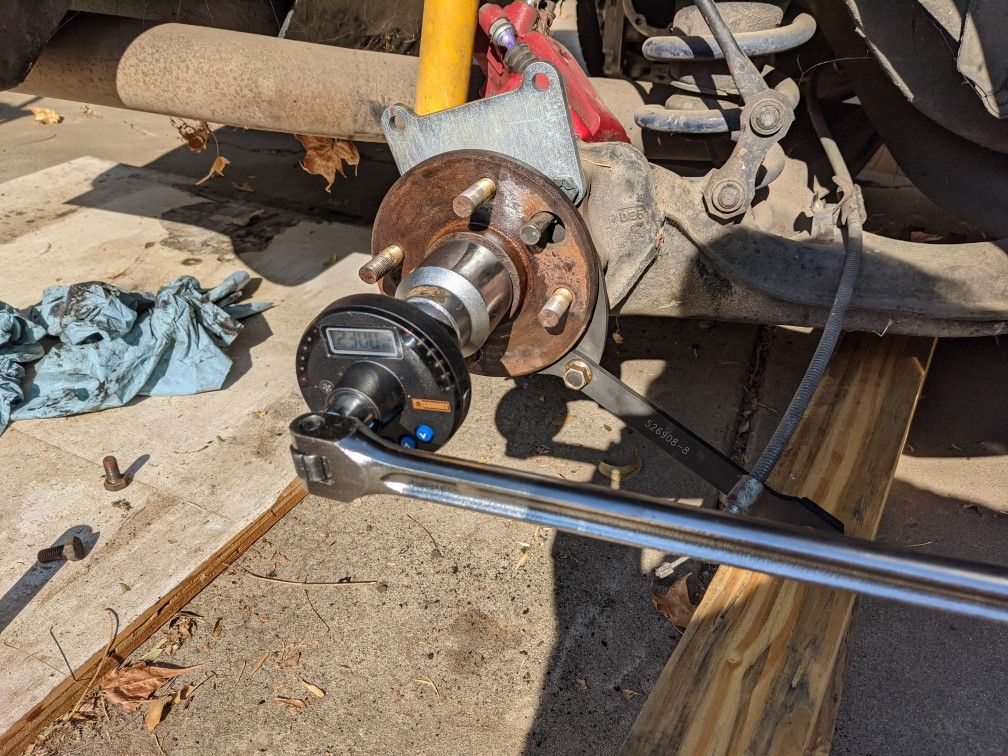
The torque meter doodad is this:

https://www.amazon.com/gp/product/B07NKYTVMX/

It supports degrees, nm, lb ft, and in lb and can move seamlessly between them. When you set by degree it also shows final torque, and when you set by torque it shows overall degrees.

I bought it for... I don't remember! Some car I owned where the head bolts were set by angle, and some weird angle like 75 degrees that was difficult to eyeball. It's been invaluable for that type of work, and came in real handy for the head on my diesel Jeep, since it's staged torque value / torque value / angle. You program all three values into the device, and then to move between presets you just hit a button. No screwups!

I did a lot of research before buying this particular one. I'm very sure it's made by Eclatorq (Taiwan) and sold under various names. In the US, it's sold by Stanley and Proto for 50% more.

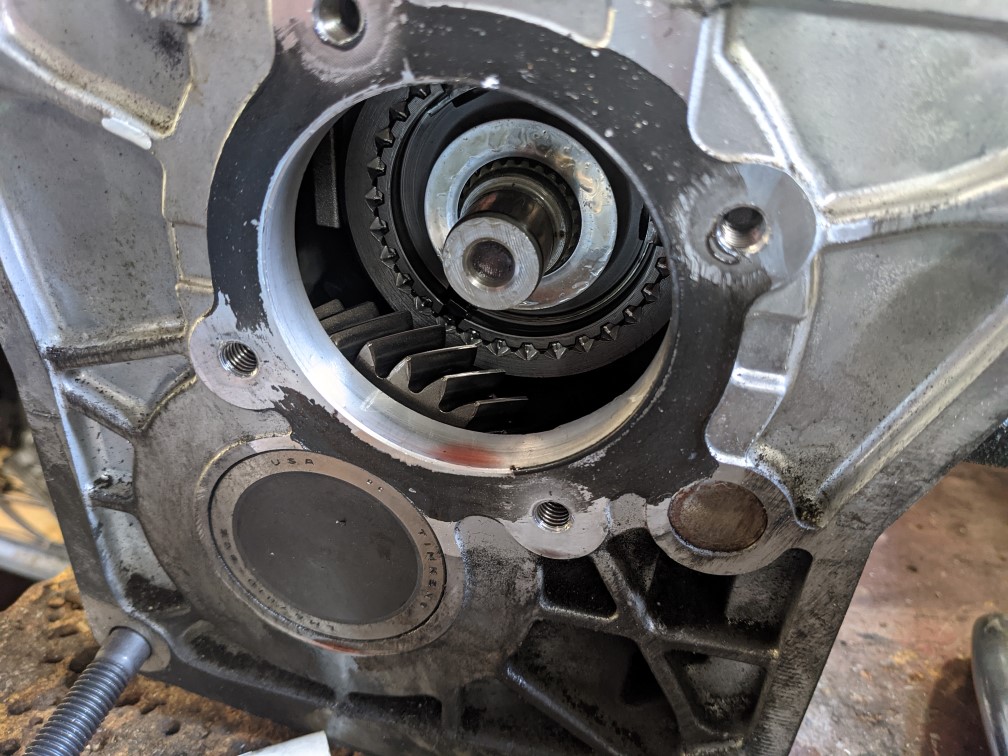
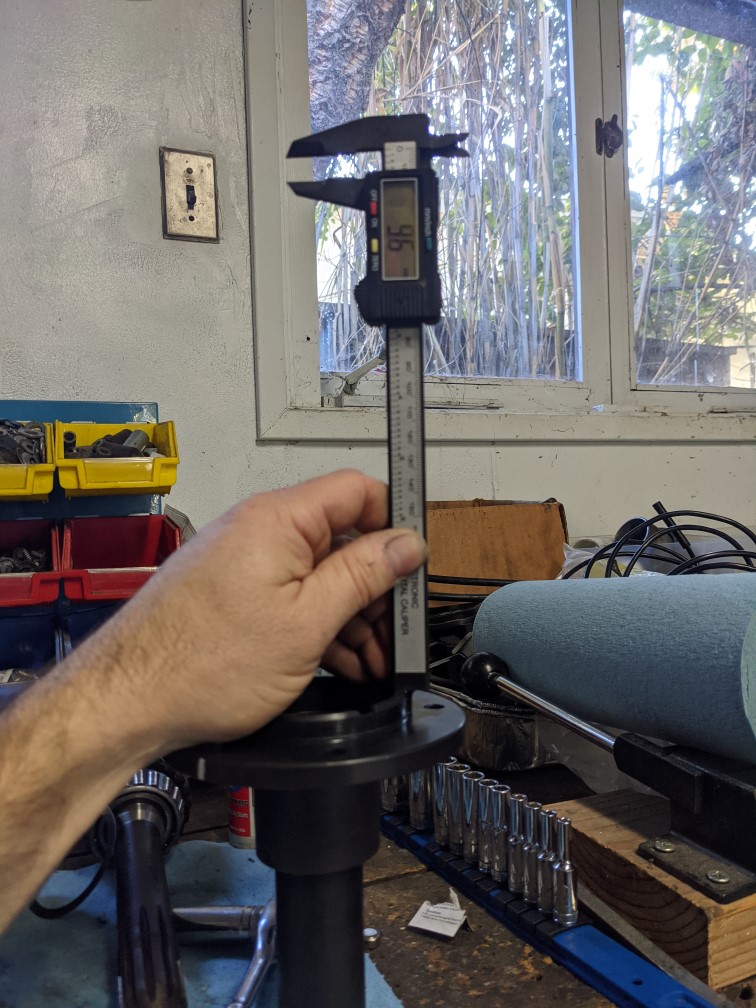
The hub brace is actually a "Toyota" cam sprocket tool:

https://www.amazon.com/dp/B000F5JMEA/

Any time you gotta hold a pulley to tighten a nut, this is your guy! The tool did not survive this operation intact - it took every ounce of my impact wrench's ability to remove the axle nut, and in doing so it vibrated the holding pin from the tool. I didn't notice, and when I want to put it back together the remaining engaged threads on pin sheared off. :( The wrench part seems fine, so I just gotta source a replacement pin. Unfortunately I can't find the part that broke - the other 10 pins have part numbers, but not the one I actually need. :(

Edit: Nevermind, it's OTC #526908-7 ... Derp.

Edit 2: I leaned the spanner wrench has an M10x1.25 thread, so if I was going to do this again I would probably not use the pins that come with the wrench, but instead bolt some round aluminum to the wrench for better engagement on the drive flange. I'm not mad at sacrificing a $20 part for the effort, but I'd also prefer to have something that works better without collateral damage. ;)

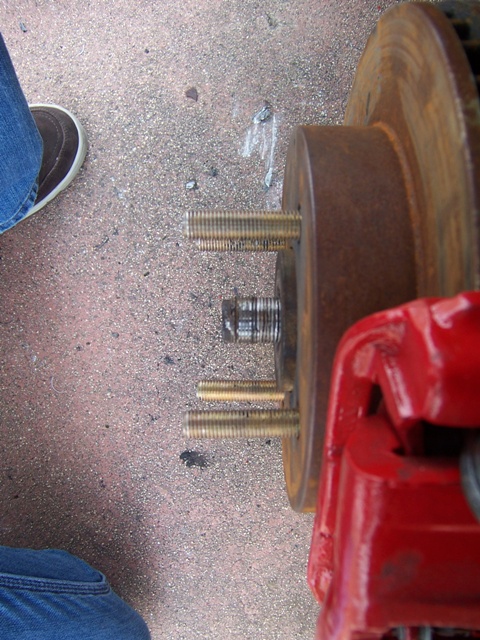
The last time I did this operation - 2005ish - I lived that "bounce on the breaker bar" dance and it was a cluster****. I don't remember the details - maybe I blocked them - but everything that could go wrong did go wrong. Overtorqued and stripped out the nut and the stub... I'm pretty sure I bought the last reverse-thread axle nut in North America! :D Breaker bar slipped and I jacked up my wrist for a week. It was awful. I've been sitting on this brake kit for months fearing the install. Like I told my wife yesterday, 15 years of collecting tools really paid off yesterday. It only took an hour! :D
thesameguy
Level 7
Level 7
Posts: 2625
Joined: Mon Apr 18, 2005 5:06 pm
Location: Sacramento
Contact:

Re: Awesome. A new noise!

Post by thesameguy »

Ha... I have a memento of the 2005 incident:

Image

:headbang
thesameguy
Level 7
Level 7
Posts: 2625
Joined: Mon Apr 18, 2005 5:06 pm
Location: Sacramento
Contact:

Re: Awesome. A new noise!

Post by thesameguy »

Well, today it finally happened.

Image

Finally sourced a T5 from a '98 Mustang V6.

No surprise, the MDL spacer fits like a glove. Next step is learn what's involved in replacing the input shaft and bearing retainer. Already have a brand new shaft with the snout adjusted for four-cylinder use and a new steel bearing retainer.... so it's "just nuts and bolts." In fact, that's all the whole thing is right now.... finally have all the parts needed to put this car back on the road. Again! :)
uroford
Newbie
Newbie
Posts: 11
Joined: Mon Jun 02, 2003 12:42 pm
Location: plymouth,mi

Re: Awesome. A new noise!

Post by uroford »

Do you have to remove the stub axel to install Tim's kit?
thesameguy
Level 7
Level 7
Posts: 2625
Joined: Mon Apr 18, 2005 5:06 pm
Location: Sacramento
Contact:

Re: Awesome. A new noise!

Post by thesameguy »

I am probably not the person to ask .. I already had Turbocoupe brakes on the car and don't really remember what the drum setup entailed. But, at the very least you do need to remove the axle nut and bearing carrier to install the caliper bracket, so you've basically done all the steps necessary to remove the stub axle anyway....
my8950
Level 7
Level 7
Posts: 1649
Joined: Wed Jan 19, 2005 11:07 pm
Location: Detroit

Re: Awesome. A new noise!

Post by my8950 »

uroford wrote: Sun Nov 22, 2020 4:13 pm Do you have to remove the stub axel to install Tim's kit?
Do you mean rear brakes for Tim's kit?
If so, no, the stub shaft doesn't need to be removed.
You do have to remove the stub shaft though if you want to remove the backing plate and keep it in one piece.
Attachments
IMG_4141.jpg
IMG_4141.jpg (41.02 KiB) Viewed 2948 times
thesameguy
Level 7
Level 7
Posts: 2625
Joined: Mon Apr 18, 2005 5:06 pm
Location: Sacramento
Contact:

Re: Awesome. A new noise!

Post by thesameguy »

After reading, Step 1 in replacing the input shaft is to prop up the transmission with the nose down.... there be loose needle bearings in there and you do not want them falling out inside the transmission case.

Image

Nothing much to see here:

Image

I did poke a boroscope in there to look around, mostly just to make sure there were no pieces of anything at the bottom. Everything I could see looked good, so hopefully this will be a good transmission.

On the left is the old bearing retainer and input shaft, on the right is the new one...

Image

This is the new input shaft - I am reusing the thrust bearing, needle bearings, and thrust washer. Probably not the best idea but they looked like they were in as-new shape so I'm doing it. ;)

Image

People advise all sorts of stuff to keep the needle bearings in place - lots of recommendations for grease, but I don't like the idea of putting that inside the transmission, so I used some super-tacky assembly lube. I had no problems getting it back into place, and because I love tempting fate I took it apart and put it back together a couple times. :D

The bearing retainer also had some sort of thrust washer that sat under the race, so I moved it from old to new as well. The new retainer came with an oil seal already installed, so that was good to go.

Image

I think I'm making an assumption that the thrust washers needed to moved over, rather than checked and potentially resized. I have not tightened the bearing retainer back down, it's just finger tight. Does anyone know best practice here? Stuff I found on the internet was all over the map. As it sits now, the input shaft spins nicely - easy to spin, a little drag... what I would expect.

Aside from knowing whether those thrust washers are correct, the only thing I am lacking - which I forgot about - is the driveshaft seal on the back. What's there looks good, so maybe I will go ahead and run and see what happens... but I think I should replace it.
Last edited by thesameguy on Sun Nov 22, 2020 10:24 pm, edited 2 times in total.
my8950
Level 7
Level 7
Posts: 1649
Joined: Wed Jan 19, 2005 11:07 pm
Location: Detroit

Re: Awesome. A new noise!

Post by my8950 »

What instruction are you following?
Also, what is the new input shaft and bearing retainer from?

You're switching because the SN95 are longer input shaft?
thesameguy
Level 7
Level 7
Posts: 2625
Joined: Mon Apr 18, 2005 5:06 pm
Location: Sacramento
Contact:

Re: Awesome. A new noise!

Post by thesameguy »

I've looked at dozens and dozens of sites - they all generally agree on the process. It's the reuse vs. replacement of thrust washers they disagree about.

The new input shaft and bearing retainer are just new parts. They're not "from" anything other than a T5 parts distributor. :)
john keefe
Level 7
Level 7
Posts: 1069
Joined: Sat Sep 02, 2006 1:13 pm
Location: Campbell, CA

Re: Awesome. A new noise!

Post by john keefe »

Sameguy, thanks for the links.

Used to be you only needed to check the new teeth to make sure they were aligning square with the counterpart on the main shaft (like checking crown and pinion in a diff), then check for "wobble" at the input shaft snout... if almost none, then you were OK.

What did your search find regarding the thrust washer? Mostly just to take up slack as you crank down the bolts for the cover? Or, was there a general agreement on achieving some measurable pre-load, and how to do it? In my case, I had new bearings and race from the "old" input shaft and cover which I swapped to the new longer input shaft and steel cover, and there wasn't any difference in wobble/feel at the snout after install. Didn't take long, though, before I got a subtle vibration/rattle in neutral, which goes away when I clutch in. New, HD clutch T/O bearing at that time. Thinking now might be a more accurate pre-load proceedure I should have referenced.
thesameguy
Level 7
Level 7
Posts: 2625
Joined: Mon Apr 18, 2005 5:06 pm
Location: Sacramento
Contact:

Re: Awesome. A new noise!

Post by thesameguy »

Yeah, that thrust washer under the bearing race is there to control end play of the input shaft. There is only a spec for end play ("none") - I can find nothing about preload. I read multiple indications that wobble of the shaft is normal and expected, the pilot bearing basically controls wobble.

I read one post (sorry I'm not keeping track of them!) that indicated after installing the washer and verifying end play you might find 0 wobble in the shaft, but if you run it for 10 miles and take it apart again the shaft will wobble.... and that's fine, only end play matters. I guess the intention is you start with no shim and keep adding thrust washer (shim) thickness until you get to 0. The very few posts I found where people even discussed preload amounted to "it shouldn't be loose or tight" and then some complaints about nobody having a spec. ;)

I am going to keep reading on the subject and maybe I will find something else. Embarrassingly I do have the T5 service manual which I haven't even cracked. I haven't been in the head space to take that on. :)

As it stands right now, my theory is that this thrust washer controls variances in the transmission rather than variances of the bearing retainer, so probably the approach is to keep it with the transmission it came from. But, I haven't checked endplay yet.... once I do that maybe it'll change my mind. :) Of course for me that would mean ordering a selection of washers so I can feel them out.... curiosity being what it is. :)
thesameguy
Level 7
Level 7
Posts: 2625
Joined: Mon Apr 18, 2005 5:06 pm
Location: Sacramento
Contact:

Re: Awesome. A new noise!

Post by thesameguy »

Eh, here's what the manual says:

6-19. ADJUSTMENT OF T5 WC INPUT/OUTPUT SHAFT BEARING PRELOAD.

a. Position transmission with input shaft end up.

b. Remove bolts (59, figure 6-21) attaching input bearing retainer k(60) and remove bearing retainer.

c. Using hand pressure, press down firmly on input shaft (65) and bearing cup (63) to ensure that power train parts in transmission are fully seated.

d. Using suitable depth micrometer measure and record the following (see figure 6-22):
1. A - distance from top of bearing cup (63) to mounting face on transmission case (117) for input bearing retainer (60).
2. B - distance from mounting face on input bearing retainer (60) to bearing cup contact surface.

e. Calculate Ts, thickness of bearing preload shim(s) (62) required, as follows:
Ts = B – A + 0.003 in., or
Ts = B – A + 0.07 mm.

f. Select shim(s) (62) of thickness calculated at step e and install on end of bearing cup noting the following:
1. Thickest shim shall be installed adjacent to bearing cup (63). Minimum thickness of this shim shall be 0.012 in. (0.30 mm).
2. Thinnest shim shall be installed adjacent to bearing contact surface in input bearing retainer (60).

So, basically it's the depth of the bearing race recess in the retainer minus the height of the race itself plus .003"

.... and my theory is wrong... it *is* making up for variances in the transmission assembly *and* the bearing retainer.

Guess I shoulda RTFM to start with. :P
thesameguy
Level 7
Level 7
Posts: 2625
Joined: Mon Apr 18, 2005 5:06 pm
Location: Sacramento
Contact:

Re: Awesome. A new noise!

Post by thesameguy »

Here is the diagram that accompanies the text above:

Image

So here I go...

This seems perfectly safe:

Image

Distance between transmission case and top of input shaft bearing race, distance "A" above:

Image

Distance "B" is slightly more difficult, since you cannot directly measure the depth of the retainer to the mating surface as there is a flange in the way. So measure the distance from the top of the flange to the mating surface, and from the top of the flange to the retainer's depth:

Image

Image

So following the formula above:

(15.9-- 9.6) - 5.5 + .07 = .87mm shim is needed

Measuring with this caliper isn't the best way to take these measurements, but if the result was close to the .5mm shim I have, I probably would have rolled with it. It's not, so I think my next step is to get a real depth micrometer and redo this so I can get the right shim.
Post Reply